What are hardware, software and apps?

Hardware refers to the physical devices you can touch—phones, tablets, computers, and
the like. On their own, these devices can barely do anything beyond turning on. You will
need software, a general term for any code that can run on devices to make them do
things, like tell you the weather, make phone calls and more. Software can be divided into
two categories: operating systems and apps. The operating system makes the device
work, but you will need apps to do specific things.


Apple, Microsoft, and Google are the ‘big three’ in the digital world. They are large
companies that produce both devices and the apps that come with them.


Microsoft is the creator of the Windows operating system, currently Windows 11, which is
available on its own Surface range of laptops. But it also has agreements with other
manufacturers like HP, Dell, Lenovo to ship their computers with Windows. Microsoft also
produces Microsoft Office, Edge browser, and other apps, as well as offering OneDrive for
cloud storage and Co-Pilot for AI assistance. These services work well together and
generally require a subscription (except for Edge).


Apple, the creator of iPads, iPhones, and Mac computers produces their own devices that
ship with iOS and a range of apps. Apple includes iWork apps like Pages and Sheets
(alternatives to Microsoft Office), plus Safari, Notes, and more. Their cloud storage is iCloud,
and the AI assistant is Siri. A subscription is only needed if you exceed the free iCloud
storage limit.


Google, behind Android, produces its own Pixel range, but also partners with
manufacturers like Motorola, Nokia, and Samsung to run Android on phones, tablets, and
laptops. Each manufacturer has its own Android with custom settings and looks. A laptop
running Chrome OS, which is based on Android, is called a Chromebook and is available
from various manufacturers. Google’s apps are generally free, but users often pay with
their privacy—a trade-off Google isn’t unique in making. As the saying goes, ‘If it’s free,
you’re not the customer—you’re the product.’


Apart from these major players, there are also a number of other operating systems,
notably Linux, which can be a very good replacement for Windows, especially on older
hardware that has problems coping with the latest requirements of Microsoft. It comes in a
multitude of flavours (called distros), and can be customised by the user. Linux is generally
free, together with most software that works with it. The downside is that proprietary
programs like Photoshop and others will not work well or not at all in Linux. However, there
are Linux-friendly programs that can do the same job.


Please be aware that this is a very simplified explanation and there is much more to each
device and other options outside the ‘big three’.

AusAlert – what is it?

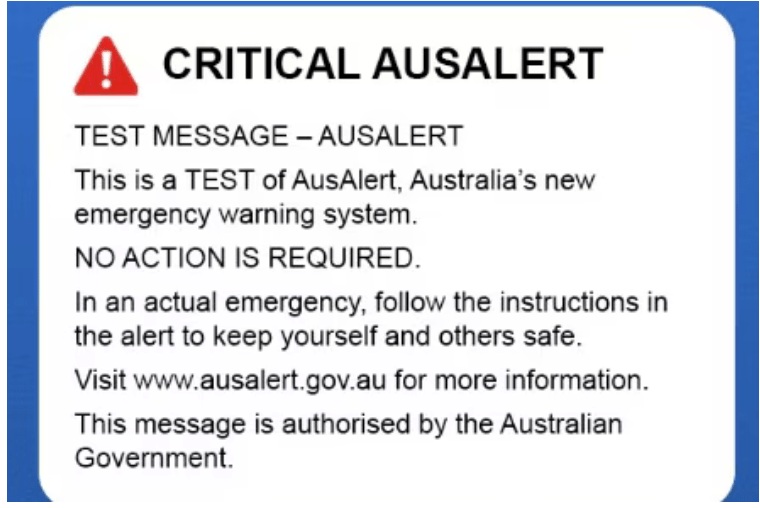
On the 27th of July at 2:00 p.m. we will all receive an identical SMS message in Australia.

This is a test of AusAlert, a system that will go live in October and allow authorities to alert every mobile phone user in a limited area to dangers. AusAlert can override settings such as Do Not Disturb to ensure every SIM-card device receives the notification. It can send alerts for security threats, public-health emergencies, biosecurity incidents, bushfires, cyclones and more.

An AusAlert message will tell you:

  • what the emergency is
  • where it is happening
  • how serious it is
  • what you should do
  • who the message is from
  • where to find more information.

The system can limit warnings to users within a radius as small as 160 m, so alerts reach only people actually affected. Only Emergency Services and the Australian Government can send AusAlerts.

When you receive this message on your phone (SMS): it is not a scam, and you do not need to do anything.

There will be 2 types of alerts: Critical Alerts and Priority Alerts.

Critical Alerts are the highest level of warning. It means you may be in danger. You should act immediately. Your mobile device will vibrate and make a loud siren-like warning sound for about 10 seconds before stopping. It will do this even if it is on silent or ‘do not disturb’. You cannot turn off Critical Alerts.

Priority Alerts are used when there is a high level of threat. It means conditions are changing. You should ‘watch and act’. Your mobile device will vibrate and make a loud siren-like warning sound that lasts for about 10 seconds. It will not vibrate or make a sound if your device is on silent or ‘do not disturb’ and you can turn off the sound and vibration for these in your phone settings.

Make your phone work ‘Your Way’

Many people I encounter struggle with their phones, but it doesn’t have to be that way. Nowadays, phones can be customised to suit each individual user—you don’t have to stick with the default setup shown when you first turn on your new device.

  1. Increase the text size. Making the text larger helps significantly. This can be adjusted in the settings on all smartphones (Samsung, Nokia, iPhone, and more). If you’re not sure where to look, go into Settings and search for “text” or “font.”
  2. Organise your home screen. Identify which apps you use most and place them on your home screen. You don’t need multiple home screens; you can always access less-used apps via the “All Apps” menu. Note that “removing” an app can mean two things:
    • a) Removing it from the home screen but keeping it installed.
    • b) Uninstalling the app completely.
    • Tip: If in doubt, it is usually best to just remove the app from the home screen. Some apps are necessary for the phone’s correct function, even if you don’t actively use them.
  3. Turn off unwanted notifications. By nature, most apps want to bombard you with notifications all day—but you can turn them off! You likely only want alerts for incoming calls or messages; everything else can wait until you are ready. Go to Settings, search for the specific app, and turn off notifications (and perhaps restrict access to location, camera, and more).
  4. Adjust notification sounds. You can also change notification sounds to something easy to hear and hopefully, not annoying. Again, go to Settings and search for “sounds.”
  5. Extend the screen timeout. Most phones turn off the screen after a very short period of inactivity, but this can be changed to almost any duration you prefer. In Settings, search for “screen timeout” or “display timeout.”
  6. Add contact shortcuts. You can add shortcuts to your most frequently called numbers on your home screen: two taps and the call is made. The exact method depends on your phone. If you are comfortable searching online, try looking up “[Your Phone Brand] + contact shortcut” to find step-by-step guides and videos.

There are plenty more customisations to make your phone work exactly as you’d like. I would be happy to help you with this if you drop in at one of my sessions at the Isis RSL. It’s a free service, and no booking is required.

Are our phones secretly listening to us?

We’ve all experienced that moment when we talk about something and then start seeing ads for it on Facebook or other sites. Are our phones secretly listening to us?

Well, yes and no.

It’s unlikely that Big Tech spends massive amounts of bandwidth constantly monitoring and analysing the conversations of millions of people worldwide. However, and this is a big but, they do collect an enormous amount of information from our devices and how we use them—linking different apps and devices to create a very detailed profile of each user. With that data they can predict your next move or interest with surprising accuracy. They can even link the profiles of different people who share the same network—like your home Wi‑Fi—to generate an even richer picture. Or they may associate your social‑media friends’ interests with yours; for example, if several of your friends ride motorbikes, you might be shown motorbike‑related ads.

All this could make you want to turn off everything and crawl under a rock, but that would be a bit extreme.

There are a few things you can do to limit the information collected about you:

  • Review the ad‑personalisation settings.
  • Disable microphone access for apps that don’t need it (just in case).
  • Turn off location history.
  • Use privacy‑focused browsers or search engines (no Chrome or Google!).
  • Avoid third‑party cookies and clear them regularly.
  • Limit logging into websites with external providers (e.g., “Log in with Google” or “Log in with Facebook”).
  • Use a VPN.

None of these measures will make you completely anonymous, but they can help reduce tracking.

Speaking of anonymity: the “browse anonymously” option offered by some browsers does NOT keep your browsing secret. It merely prevents others who use the same computer from seeing your cookies and browsing history; it doesn’t hide your activity from the sites you visit or from network observers.

The Confusion about OneDrive

One of the most confusing things about Windows (10 and 11) can be OneDrive.

The idea is that it backs up everything important, like Documents, Photos etc. to the Microsoft Cloud, called OneDrive. That way if you lose your computer, your files are safe. Sounds great, doesn’t it? Problem is, it is not a real backup and MS only gives you 5GB of storage for free; and as we saw last month, that is not a lot if you have photos and videos. You can get more storage at a price, but it probably is cheaper and better in the long run to backup your data onto an external hard drive.

When you run out of space on your OneDrive, that’s when things get messy. Some files are on your PC, some are only on OneDrive and some are on both.

To sort all this out, it is best to stop OneDrive from syncing completely. You can do this by clicking on the cloud icon on the bottom right of your taskbar, then chose ‘Help&Settings’ – ’Settings’ – ’Account’, then chose ‘unlink this PC’.

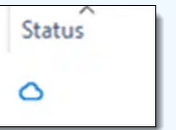
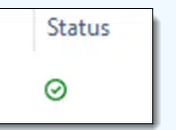
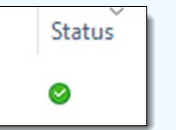
Now have a look at your files in Files Explorer. They might have a ‘Status’, where

means this File is NOT on your PC, but only on OneDrive.

means the file is currently used and available on your PC (perhaps)

means the file is on your PC (hopefully)

For any others (there is a grey cloud as well), assume that the file is not available on your PC.

Now open your browser (Edge, Chrome, Firefox…) and search for ‘OneDrive login’. Open the search result that says Microsoft OneDrive (https://onedrive.live.com/login) and enter your Microsoft user ID and password (the one you use when you sign into your computer). Go to ‘My Files’ on the left, and now you can see all the files that are on your OneDrive. Select the ones you want and download them to your computer.

You should now have everything back where you want it, as long as OneDrive does not get activated again (this might happen on a Windows update, so keep an eye on it).

I said at the beginning that OneDrive is not a real backup – it is actually more of a tool to sync different computers on the same account, but for some reason MS calls it backup. And similar issues can arise with Google’s photo ‘backup’ and Apple’s iCloud.

Bits and Bytes

What are bytes as in kilobytes, megabytes or gigabytes?
A byte is a unit of data or information, the same as a gram is a unit of weight.
Lets say one letter of the alphabet takes 1 byte to store or transmit, then a tightly written
page with 1000 letters (words) would be 1 kilobyte. One thousand such pages in a book
would be 1 Megabyte, and a 1000 of these books in a library would be 1 Gigabyte. That is a
lot of reading material.
Images are also taking up bytes, but each image is divided into small sections called pixels
that can be different colours. An average photo taken by a phone uses about 3 MB
(megabytes) to store or transmit. So to fill up our library with 1 GB (gigabyte) of images
would only take about 300 pictures, versus the huge amount of text stored in the same
space.
Videos use more again, as every second of video shows many images in quick succession,
and your average movie uses about 4GB per hour. In our library example that would only
be about 15 minutes of video in the same space as the 1000 books or the 300 pictures.
These numbers influence how much you can store on your phone or computer and also,
how much you can download or view with the data plan you have purchased.
So for example if your phone has a monthly mobile data allowance of 12GB, you can
probably do all the texting, emailing and internet browsing you want without running out of
data (see the huge book library above). You can even look at grumpy cat pictures without
making too much of a dent in it. But if you start watching videos, you will run out of data
quite quickly. And it doesn’t matter so much whether you are watching the video on
something like YouTube, or just get presented with video advertising on Facebook; it is all
lots of data being used up.
Please remember, the numbers used here are just examples for illustration, in real life it is
much more complicated, but the ratios of text, vs image, vs video are useful to remember.

QR Codes

Frequent question: What are those ‘squiggly boxes’ I am supposed to scan and how do I do this?

QR codes or Quick Response Codes were originally used to track parts on an assembly line, similar to bar codes, but now they are mainly used to give quick access to a website, or sometimes other data.

Most phones (both Android and iPhone) can scan a QR code by just using the camera: point the camera at the QR square without clicking the button to take a picture. After a moment a “bubble” with a web address appears, click on that and it will open the webpage.

If it doesn’t work straight away move your phone back to allow it to focus better. Generally this function is enabled by default, but you might have to go into your camera settings and enable it manually.

If you have an older phone, you might have to download a QR reader app, but be careful: there are a lot of apps that carry ‘baggage’ in the form of unwanted apps. Look for QR code reader apps that have a high rating from as many people as possible.

A word of warning about QR codes. It is possible that someone has replaced an original QR code on a restaurant menu or poster with a false one that might send you off to a scam site, so be cautious with what you do on any site opened with a QR code. Do not enter any personal or banking information and always check the address of the website. If in doubt, try another way to get the information you require.

These black and white squares can be very handy, just, as always, be aware where you are being sent to and what information you enter.

Connecting to Wi-Fi

When your phone or laptop has been set up for while and automatically links to your wifi, you don’t think about it anymore. But what happens if something in your WiFichanges, you want to link up at a new placeor have a new device? Let’s go through it.

On Windows

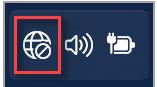
On the right of your taskbar (the bottom strip of your desktop) there should be a small icon looking like a globe , when you click on that a box opens with a number of settings, on the top left is Wifi. Click on the down-arrow next to it and you should be presented with a list of available wifi networks. Choose the one you want, enter the password and select ‘connect automatically’ if you want . Confirm whether the device should be discoverable in the network (only use this at home), and you should be in, showing ‘connected’.

On Mac

When a Wi-Fi network is available, the Wi-Fi icon   is shown in the menu bar at the top rightof the screen. Click the icon, then choose a network to join. Enter the password and you should be connected.

On Android (Samsung, Nokia etc)

Swipe down from the top of the screen and either find a button ‘Wifi’ or ‘Internet, LONG press it and it will open the settings app (or you can just open the settings app and search for wifi). Make sure wifi is toggled on and tap the network you want to connect to from the list shown. Enter the password and auto-connect if you want, and you should be connected.

On Iphone/ipad

From your Home screen, go to Settings > Wi-Fi.

  1. Tap to turn on Wi-Fi. Your device will automatically search for available Wi-Fi networks. Tap the name of the Wi-Fi network that you want to join. You will be asked to enter the network’s password, then look for the blue checkmark next to the network name, and the Wi-Fi icon in the upper corner of your screen. This means you’re successfully connected.

Wifi can either come from your NBN, from a public network in a caféor similar or from a hotspot (using a phone as the wifi provider). Be careful if you are using a public wifi as they might not be very secure – so avoid doing your banking or such things there.

Finding things on the web

Although there is a lot of ‘junk’ out there on the internet, there is also limitless information on just about everything—it is just a matter of finding the needle in the haystack. But search engines like Google, Bing, etc., can actually be really helpful, if you know how to coax the information out of them without being presented with lots of irrelevant paid content (this is usually marked as Ad or Promoted).

First rule: be specific. If you are looking for information on purple-spotted doodads, don’t just put in ‘doodads’; put in ‘purple-spotted doodads.’

And then, depending on the results, add or remove words in your search. Perhaps you get more info on spotted than on purple; then remove the spotted from your search and try again. Or add the location or other pertinent details.

There are also a couple of useful tricks:

1. Put the most important word(s) in apostrophes; that means the result must have this word in it.

2. Add a – (minus) to eliminate results, e.g., ‘purple-spotted doodads -dingbats,’ will not show results that contain dingbats.

You can also narrow down your search by region (Australia, the world, the UK…), by time (last year, last month…), and more. Have a look at the top of the search page for these. You can also specifically search for images, videos, news, forums, and more. Again, check the top of the search page.

If you are looking for very specific information, you can even use a different, specialised search engine like Wolfram Alpha for scientific searches or Core for scholarly research, and there are many more.

Appliance not working as it should? Type the appliance and the symptoms into the search field, and chances are you will find the answer or even a how-to video.

I often get asked: ‘How do I do this thing on my phone?’ Unless I happen to know, my first step is to type the question into a search engine, and nine times out of ten, the answer is right there on the second or third site. Among the 5 billion people using the internet, there should be at least one who asked the same question and found a knowledgeable soul posting the answer.

Emergency+ app

Generally I do not recommend any apps, but there is one app that I believe should be on every phone in Australia: the Emergency+ app.

It is a free application developed by Australia’s emergency services and industry partners. It works across Australia, using GPS functionality built into smartphones to help a Triple Zero (000) caller provide critical location details required to mobilise emergency services.

Important – if there is no mobile coverage on any network, you will not be able to reach the Emergency Call Service via a mobile telephone​​.”

The app makes it easy to call ‘000’, the SES (132 500) or the Police(131 444), with large buttons prominently displayed. It also shows your location by address, by latitude and longitude, by map and by what3words – all on the one page (and you can increase the character size in the app settings).

On an second page there are other useful numbers like Crime Stoppers (1800 333 000), Health Direct (1800 022 222), Poisons Information Centre (131 126) and more. There are also videos showing how to administer CPR on adults, children and infants. And it includes a link to the various states’ fire alert websites.

The Emergency+ app is available for free download via the Apple AppStore (for iPhones) and the Google PlayStore (for Android phones like Samsung, Motorola, Nokia etc)

If you don’t have this on your phone already, go download it now – you never know when you might need it.

Once the app is installed on your phone, open it and allow location access. This permission is required for the app to display your location in an emergency. Explore the features and understand how to use the app in an emergency situation.

I hope you will never need it, but is is good to have when you do.