
What are bytes as in kilobytes, megabytes or gigabytes?
A byte is a unit of data or information, the same as a gram is a unit of weight.
Lets say one letter of the alphabet takes 1 byte to store or transmit, then a tightly written
page with 1000 letters (words) would be 1 kilobyte. One thousand such pages in a book
would be 1 Megabyte, and a 1000 of these books in a library would be 1 Gigabyte. That is a
lot of reading material.
Images are also taking up bytes, but each image is divided into small sections called pixels
that can be different colours. An average photo taken by a phone uses about 3 MB
(megabytes) to store or transmit. So to fill up our library with 1 GB (gigabyte) of images
would only take about 300 pictures, versus the huge amount of text stored in the same
space.
Videos use more again, as every second of video shows many images in quick succession,
and your average movie uses about 4GB per hour. In our library example that would only
be about 15 minutes of video in the same space as the 1000 books or the 300 pictures.
These numbers influence how much you can store on your phone or computer and also,
how much you can download or view with the data plan you have purchased.
So for example if your phone has a monthly mobile data allowance of 12GB, you can
probably do all the texting, emailing and internet browsing you want without running out of
data (see the huge book library above). You can even look at grumpy cat pictures without
making too much of a dent in it. But if you start watching videos, you will run out of data
quite quickly. And it doesn’t matter so much whether you are watching the video on
something like YouTube, or just get presented with video advertising on Facebook; it is all
lots of data being used up.
Please remember, the numbers used here are just examples for illustration, in real life it is
much more complicated, but the ratios of text, vs image, vs video are useful to remember.
Author: Uschi
a horse rider, a nerd, an animal lover, crafter, baker....
QR Codes
Frequent question: What are those ‘squiggly boxes’ I am supposed to scan and how do I do this?
QR codes or Quick Response Codes were originally used to track parts on an assembly line, similar to bar codes, but now they are mainly used to give quick access to a website, or sometimes other data.
Most phones (both Android and iPhone) can scan a QR code by just using the camera: point the camera at the QR square without clicking the button to take a picture. After a moment a “bubble” with a web address appears, click on that and it will open the webpage.
If it doesn’t work straight away move your phone back to allow it to focus better. Generally this function is enabled by default, but you might have to go into your camera settings and enable it manually.
If you have an older phone, you might have to download a QR reader app, but be careful: there are a lot of apps that carry ‘baggage’ in the form of unwanted apps. Look for QR code reader apps that have a high rating from as many people as possible.
A word of warning about QR codes. It is possible that someone has replaced an original QR code on a restaurant menu or poster with a false one that might send you off to a scam site, so be cautious with what you do on any site opened with a QR code. Do not enter any personal or banking information and always check the address of the website. If in doubt, try another way to get the information you require.
These black and white squares can be very handy, just, as always, be aware where you are being sent to and what information you enter.
Connecting to Wi-Fi
When your phone or laptop has been set up for while and automatically links to your wifi, you don’t think about it anymore. But what happens if something in your WiFichanges, you want to link up at a new placeor have a new device? Let’s go through it.
On Windows
On the right of your taskbar (the bottom strip of your desktop) there should be a small icon looking like a globe 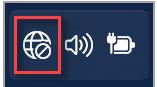 , when you click on that a box opens with a number of settings, on the top left is Wifi. Click on the down-arrow next to it and you should be presented with a list of available wifi networks. Choose the one you want, enter the password and select ‘connect automatically’ if you want . Confirm whether the device should be discoverable in the network (only use this at home), and you should be in, showing ‘connected’.
On Mac
When a Wi-Fi network is available, the Wi-Fi icon  is shown in the menu bar at the top rightof the screen. Click the icon, then choose a network to join. Enter the password and you should be connected.
On Android (Samsung, Nokia etc)
Swipe down from the top of the screen and either find a button ‘Wifi’ or ‘Internet, LONG press it and it will open the settings app (or you can just open the settings app and search for wifi). Make sure wifi is toggled on and tap the network you want to connect to from the list shown. Enter the password and auto-connect if you want, and you should be connected.
On Iphone/ipad
From your Home screen, go to Settings > Wi-Fi.
- Tap to turn on Wi-Fi. Your device will automatically search for available Wi-Fi networks. Tap the name of the Wi-Fi network that you want to join. You will be asked to enter the network’s password, then look for the blue checkmark next to the network name, and the Wi-Fi icon in the upper corner of your screen. This means you’re successfully connected.
Wifi can either come from your NBN, from a public network in a caféor similar or from a hotspot (using a phone as the wifi provider). Be careful if you are using a public wifi as they might not be very secure – so avoid doing your banking or such things there.
